

Model Context Protocol
The Model Context Protocol (MCP) integration lets you connect an AI appThird-party software that connects to Home Assistant through the Model Context Protocol integration. An AI app can use the AI tools that you allow. [Learn more], such as ChatGPT or Claude, to Home Assistant. The AI app can then control your devices and see the current state of your home.
With this integration, Home Assistant is the MCP server. It offers its AI toolsA function that conversation agents and AI apps can use to read information, control entities, or manage Home Assistant. AI tools are grouped into sets. Each set provides different functionality. Some sets only work for administrators. [Learn more] to the AI app. The AI tools are grouped into sets. Unless you change the settings, the AI app can use all sets of AI tools. Home Assistant has two built-in sets of AI tools:
- Device control: Reads and controls the entitiesAn entity represents a sensor, actor, or function in Home Assistant. Entities are used to monitor physical properties or to control other entities. An entity is usually part of a device or a service. [Learn more] you expose to voice assistants, on the exposed entities page.
- Home Assistant: Looks into and manages Home Assistant itself. It can read all entities, logs, and history, list and reload integrations, and perform any action. Only administrators can use it.
Integrations can add more sets of AI tools. For example, KNX adds a KNX set.
To choose which sets of AI tools the AI app can use, refer to Configuration options.
Home Assistant has two MCP integrations, and they work in opposite directions:
- Model Context Protocol (this page): An AI app, such as Claude or ChatGPT, controls Home Assistant.
- Model Context Protocol Client: Your Home Assistant conversation agent uses AI tools from another service.
If you want your Home Assistant conversation agentSoftware that Home Assistant uses to understand a request and decide what to do. Home Assistant has a built-in conversation agent. Integrations can add others, including ones that use AI. Conversation agents that use AI can also use AI tools. Each assistant uses a conversation agent. [Learn more] to use AI tools from another service, such as web search, you need the Model Context Protocol Client integration.
Prerequisites
- Your MCP server URL. To get it:
- Go to Settings > System > AI.
- If the Model Context Protocol card shows an Enable button, select it.
- Next to the URL you want to use, select Copy URL
. - The Main URL exposes the sets of AI toolsA function that conversation agents and AI apps can use to read information, control entities, or manage Home Assistant. AI tools are grouped into sets. Each set provides different functionality. Some sets only work for administrators. [Learn more] that you choose in the configuration options.
- Under Individual URLs, each set of AI tools has its own URL.
- An AI appThird-party software that connects to Home Assistant through the Model Context Protocol integration. An AI app can use the AI tools that you allow. [Learn more] that supports MCP servers.
- If the AI app runs in the cloud, for example when you use it through a website, your Home Assistant instance must be accessible from the internet. Use Home Assistant Cloud or another method of remote access.
For detailed configuration instructions, refer to the Client configuration section.
Configuration
To add the Model Context Protocol service to your Home Assistant instance, use this My button:

If the above My button doesn’t work, you can also perform the following steps manually:
-
Browse to your Home Assistant instance.
-
In the bottom right corner, select the
Add Integration button. -
From the list, select Model Context Protocol.
-
Follow the instructions on screen to complete the setup.
When you set up the integration, the main URL exposes all sets of AI toolsA function that conversation agents and AI apps can use to read information, control entities, or manage Home Assistant.
AI tools are grouped into sets. Each set provides different functionality. Some sets only work for administrators. [Learn more] and requires an administrator account. To change this, go to Settings > System > AI, and next to Main URL, select Configure
Configuration options
The integration provides the following configuration options. They only apply to the main URL (/api/mcp), shown as Main URL in Settings > System > AI.
Each set of AI toolsA function that conversation agents and AI apps can use to read information, control entities, or manage Home Assistant.
AI tools are grouped into sets. Each set provides different functionality. Some sets only work for administrators. [Learn more] also has its own URL, listed under Individual URLs. For example, /api/mcp/assist only exposes Device control. These URLs ignore the options below. They are never read-only, and all of them except the Device control URL require an administrator account.
If the main URL exposes every set of AI tools, including sets of AI tools that integrations add later. This option is turned on by default. If you set up the integration before this option existed, it stays turned off so that your clients keep the sets of AI tools you selected. Turn it off to select individual sets of AI tools.
The sets of AI tools that the main URL exposes when Expose all AI tools is turned off. Device control only accesses the entities you expose to voice assistants. Home Assistant accesses everything and requires an administrator account.
If only administrator accounts can use the main URL. This option is turned on by default. If you set up the integration before this option existed, it stays turned off so that your clients keep working. When the main URL exposes Home Assistant, for example with Expose all AI tools, an administrator account is always required.
If the main URL only exposes AI tools that are marked as not changing anything, such as getting the current state of your home. For example, it leaves out Call action and Reload config entry from the Home Assistant set, and the AI tools in Device control that control your devices. This option is turned off by default.
Client configuration
Home Assistant implements the standard Model Context Protocol, including OAuth 2.0 with PKCE. It supports OAuth Client ID Metadata Documents, so AI appsThird-party software that connects to Home Assistant through the Model Context Protocol integration. An AI app can use the AI tools that you allow. [Learn more] set up the client ID and callback URL automatically.
Example: Claude
Before you start, copy your MCP server URL as described in the prerequisites.
Claude connects to your MCP server from the cloud, also when you use Claude Desktop. Your Home Assistant instance must be accessible from the internet.
-
Open the form to add a connector:
- On claude.ai, go to the Claude connectors page. In the top-right corner, select Add > Add custom connector.
- In Claude Desktop, go to Settings > Connectors and select Add > Add custom connector.
-
Enter the following details:
-
Name:
Home Assistant - MCP Server URL: Paste your MCP server URL.
-
Name:
-
Select Add.
-
Claude verifies the MCP server and shows a dialog. Enter the following details:
- Authentication: Select Sign in now.
- OAuth client: Select Use Claude’s published identity.
-
Select Add.
-
On the page for your new connector, select Connect.
-
Log in to your Home Assistant instance.
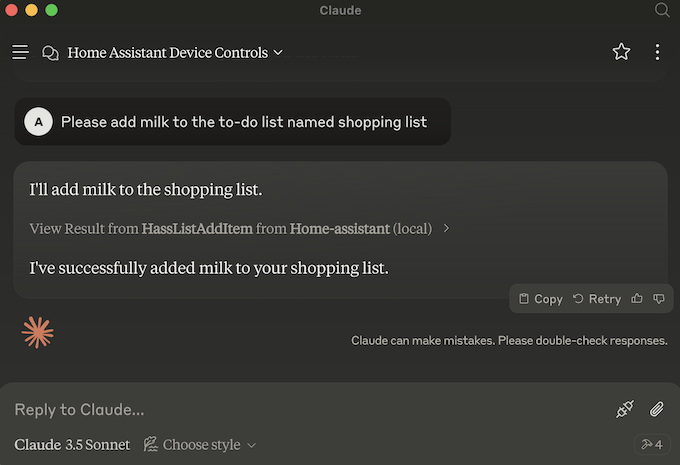
- Result: You can now enable AI toolsA function that conversation agents and AI apps can use to read information, control entities, or manage Home Assistant. AI tools are grouped into sets. Each set provides different functionality. Some sets only work for administrators. [Learn more] from Home Assistant when chatting with Claude. This lets you control Home Assistant much like you do with Assist. Claude asks for your permission before it uses an AI tool, unless you choose to always allow it.
Example: ChatGPT
Before you start, copy your MCP server URL as described in the prerequisites.
If you use ChatGPT on chatgpt.com, your Home Assistant instance must be accessible from the internet.
- Open the form to add an MCP server:
- On chatgpt.com, go to the ChatGPT plugins page. In the top-right corner, select Add > Add custom MCP server.
- In ChatGPT Desktop, go to Settings > Plugins and select Add > Add MCP server.
- Enter the following details:
-
Name:
Home Assistant - Connection: Paste your MCP server URL.
- Authentication: Select OAuth.
-
Name:
- Select I understand and want to continue.
- Select Create as plugin.
- ChatGPT offers to Connect Home Assistant. Select Continue to Home Assistant.
- Log in to your Home Assistant instance.
Example: Claude Code
Claude Code connects to MCP servers over HTTPS only. Use the MCP server URL of your remotely accessible Home Assistant instance, as described in the prerequisites.
-
Install Claude Code and log in.
-
In your terminal, run the following command. Replace
<your_mcp_server_url>with your MCP server URL.claude mcp add --transport http home-assistant <your_mcp_server_url> -
Run the following command:
claude mcp login home-assistant -
In your web browser, log in to your Home Assistant instance.
- Result: In Claude Code, run
/mcpand selecthome-assistantto view the connected server and its available AI toolsA function that conversation agents and AI apps can use to read information, control entities, or manage Home Assistant. AI tools are grouped into sets. Each set provides different functionality. Some sets only work for administrators. [Learn more].
- Result: In Claude Code, run
Example: Codex
-
Install Codex and sign in.
-
In your terminal, run the following command. Replace
<your_mcp_server_url>with your MCP server URL, for examplehttp://homeassistant.local:8123/api/mcp.codex mcp add homeassistant --url <your_mcp_server_url> -
Codex opens your Home Assistant instance in your web browser. Log in to your Home Assistant instance.
Example: OpenCode
-
Install OpenCode.
-
In your terminal, run the following command. Replace
<your_mcp_server_url>with your MCP server URL.opencode mcp add home-assistant --url <your_mcp_server_url> -
Run the following command:
opencode mcp auth home-assistant -
In your web browser, log in to your Home Assistant instance.
Supported functionality
Tools
Home Assistant offers its AI toolsA function that conversation agents and AI apps can use to read information, control entities, or manage Home Assistant. AI tools are grouped into sets. Each set provides different functionality. Some sets only work for administrators. [Learn more] as MCP tools. The AI appThird-party software that connects to Home Assistant through the Model Context Protocol integration. An AI app can use the AI tools that you allow. [Learn more] can use the AI tools to read information and control Home Assistant. Each URL only exposes the AI tools from its sets of AI tools. For the AI tools in the Home Assistant set, refer to List of Home Assistant AI tools.
Prompts
Home Assistant provides one default MCP prompt. It tells the AI appThird-party software that connects to Home Assistant through the Model Context Protocol integration. An AI app can use the AI tools that you allow. [Learn more] how to use the AI toolsA function that conversation agents and AI apps can use to read information, control entities, or manage Home Assistant. AI tools are grouped into sets. Each set provides different functionality. Some sets only work for administrators. [Learn more]. It contains the instructions of the sets of AI tools that the URL exposes.
Resources
When the URL exposes Device control, Home Assistant also offers a read-only MCP resource named homeassistant://assist/context-snapshot.
This resource returns a plain-text snapshot of the current state of your exposed entitiesAn entity represents a sensor, actor, or function in Home Assistant. Entities are used to monitor physical properties or to control other entities. An entity is usually part of a device or a service. [Learn more]. It matches the output of the Get live context AI toolA function that conversation agents and AI apps can use to read information, control entities, or manage Home Assistant.
AI tools are grouped into sets. Each set provides different functionality. Some sets only work for administrators. [Learn more] (homeassistant__GetLiveContext). It’s useful when a static snapshot is enough. For example, you can use it to check what the AI appThird-party software that connects to Home Assistant through the Model Context Protocol integration.
An AI app can use the AI tools that you allow. [Learn more] sees. Without Device control, this resource isn’t available.
Known limitations
The Home Assistant Model Context Protocol integration currently only supports a subset of MCP features:
- Prompts: Supported
- Tools: Supported
- Resources: Supported (Device control only)
- Sampling: Not supported
- Notifications: Not supported
Troubleshooting
Repeated OAuth failures
Symptom: Unable to access Home Assistant after several failed login attempts
If authentication keeps failing during the OAuth setup flow, the most likely cause is that one or more OAuth details are incorrect, such as the client ID or the Home Assistant URL.
Resolution
- Review the OAuth configuration in your client and verify the details:
- Make sure the Client ID is the base URL of the AI appThird-party software that connects to Home Assistant through the Model Context Protocol integration.
An AI app can use the AI tools that you allow. [Learn more] (for example,
https://claude.aifor Claude orhttps://chatgpt.comfor ChatGPT), and never your Home Assistant instance URL. IndieAuth validates that the redirect URI shares the same scheme and domain with the client ID; setting the client ID to your Home Assistant instance causes the authorization flow to fail. - Home Assistant does not use a client secret. If the field is required by the client application, enter any text; if it is optional, leave it blank.
- Make sure the URL used to access Home Assistant matches the configured Internal URL or External URL in Settings > System > Network.
- Make sure the Client ID is the base URL of the AI appThird-party software that connects to Home Assistant through the Model Context Protocol integration.
An AI app can use the AI tools that you allow. [Learn more] (for example,
- If you have explicitly enabled IP bans in Home Assistant and repeated failed sign-in attempts caused a ban, check the
ip_bans.yamlfile in your Home Assistant configuration directory. If your computer’s IP address or the client’s IP address is listed there, remove it, restart Home Assistant, and then try authenticating again.
Symptom: OAuth discovery fails or authorization server metadata is rejected
When connecting an external client (such as ChatGPT or Claude) through a tunnel, reverse proxy, or custom domain, the client fails to complete OAuth discovery or rejects the metadata with an error regarding the issuer or registration endpoint.
Description
This can occur for two reasons:
-
Hostname or proxy mismatch: Home Assistant checks incoming requests against its configured internal and external URLs. If the hostname used by the AI appThird-party software that connects to Home Assistant through the Model Context Protocol integration.
An AI app can use the AI tools that you allow. [Learn more] does not match the configured URL, or if reverse-proxy headers (
X-Forwarded-Host,X-Forwarded-Proto) are missing or mismatched, Home Assistant cannot resolve theissuerin/.well-known/oauth-authorization-serverand returns relative paths. Conforming OAuth clients reject this metadata because RFC 8414 requires theissuerto match the URL used to discover it. -
Unsupported Dynamic Client Registration (RFC 7591): Home Assistant uses the
draft-ietf-oauth-client-id-metadata-documentstandard (client_id_metadata_document_supported: true) rather than RFC 7591 Dynamic Client Registration. AI apps that strictly require RFC 7591 Dynamic Client Registration cannot register automatically.
Resolution
- Go to Settings > System > Network and make sure that the External URL (or Internal URL) matches the exact hostname and scheme used by the AI app to reach Home Assistant.
- If using a reverse proxy or tunnel (such as Cloudflare Tunnel), make sure Home Assistant is configured to trust forwarded headers from the proxy. See Reverse proxies in the HTTP integration documentation for details on configuring Trust X-Forwarded-For and Trusted proxies.
- If the AI app supports manual OAuth configuration (such as ChatGPT’s user-defined OAuth client), enter the authorization and token endpoints manually rather than relying on automatic discovery.
- Using Home Assistant Cloud (
https://<your-id>.ui.nabu.casa) avoids reverse-proxy and tunnel configuration pitfalls because it automatically handles canonical hostnames and SSL termination.
Removing the integration
This integration can be removed by following these steps:
To remove an integration instance from Home Assistant
- Go to Settings > Devices & services and select the integration card.
- Next to the entry you want to remove, select the three dots
menu. Then, select Delete. - Depending on the integration, the entries are listed under one of the following headings:
- Devices
- Hubs
- Services
- Integration entries
- Depending on the integration, the entries are listed under one of the following headings:
- To confirm, select Delete.
- Home Assistant also deletes the devices and entities of the entry.
- If Home Assistant asks you to restart, restart Home Assistant.
- If Home Assistant asks whether to also delete the application credentials, select Remove or Keep.
- If you keep them, Home Assistant uses them automatically when you add the integration again.
- To delete them later, refer to Deleting application credentials.