VIZIO SmartCast
The VIZIO SmartCast integrationIntegrations connect and integrate Home Assistant with your devices, services, and more. [Learn more] allows you to control SmartCast-compatible TVs and sound bars (2016+ models) locally from Home Assistant.
Use cases
- Control your TV or sound bar (power, volume, inputs, and apps) from dashboards and automations.
- Turn on the TV and launch a specific app when a movie night scene is activated.
- Automatically lower the volume at night or when a doorbell rings.
- Send remote control key presses (navigation, playback, channel control) from automations or scripts.
Prerequisites
Your device must be connected to the same network as Home Assistant. If Zeroconf discovery is enabled, your device is discovered automatically and setup can be started from the discovered card.
TVs require an access token to communicate with Home Assistant. You do not need one up front: leave the access token field empty during setup, and the integration will guide you through a pairing process in which a PIN is displayed on the TV screen. Sound bars do not require an access token.
Configuration
To add the VIZIO SmartCast device to your Home Assistant instance, use this My button:

VIZIO SmartCast can be auto-discovered by Home Assistant. If an instance was found, it will be shown as Discovered. You can then set it up right away.
If it wasn’t discovered automatically, don’t worry! You can set up a manual integration entry:
-
Browse to your Home Assistant instance.
-
In the bottom right corner, select the
Add Integration button. -
From the list, select VIZIO SmartCast.
-
Follow the instructions on screen to complete the setup.
IP address:port of your device (for example, 192.168.1.10:7345). See finding your device’s address if you don’t know it.
Finding your device’s address
If your device is not automatically discovered, you can find its address using the vizaio command line tool on any machine on the same network:
pip3 install 'vizaio[cli]'
vizaio discover
If the pip3 command is not found, replace it with pip.
Write down the IP address and port number of the device you want to add. If you have trouble finding a device you were expecting to see, you can try increasing the discovery timeout period by adding the --timeout option (for example, vizaio discover --timeout 10).
Pairing manually using vizaio
Pairing through the Home Assistant frontend is recommended, but you can also obtain an access token manually. Make sure that your TV is on, then run the interactive pairing command by replacing DEVICE_IP:DEVICE_PORT with the address obtained in the previous section:
vizaio pair interactive DEVICE_IP:DEVICE_PORT
A PIN code will be displayed at the top of your TV. Enter it when prompted. For scripted use, vizaio pair begin DEVICE_IP:DEVICE_PORT starts pairing and prints the matching vizaio pair complete command with everything filled in except the PIN. Provide the returned authentication token in the access token field during setup.
Options
To define options for VIZIO SmartCast, follow these steps:
-
In Home Assistant, go to Settings > Devices & services.
-
If multiple instances of VIZIO SmartCast are configured, choose the instance you want to configure.
-
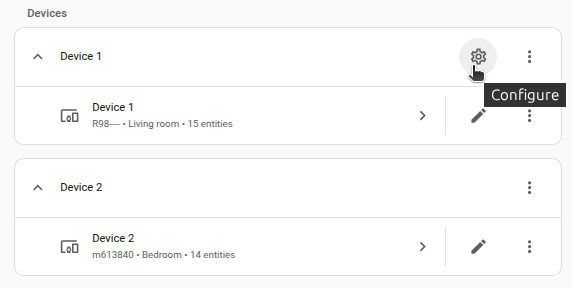
On the card, select the cogwheel
. - If the card does not have a cogwheel, the integration does not support options for this device.
-
Edit the options, then select Submit to save the changes.
The number of volume levels the volume changes by with each volume up or volume down command. Defaults to 1.
For TVs, whether the selected apps should be included in or excluded from the source list.
Obtaining a list of valid apps to include or exclude
The list of apps is fetched daily from VIZIO’s app catalog (with a copy bundled in the vizaio library as a fallback). To see the names you can include or exclude, check the source_list attribute of your TV’s media player entity under Settings > Tools > States.
Supported functionality
Media player
The integration creates a media player entity for each configured device. Depending on the device type, it supports:
- Power on/off and power state.
- Volume up/down by the configured volume step, setting an absolute volume level, and muting.
- Source selection: for TVs, the source list combines the device’s physical inputs with the available SmartCast apps, and selecting an app launches it. For speakers, the source list contains the physical inputs.
- Sound mode selection (when the device reports equalizer sound modes).
- Play/pause and next/previous track (next/previous change the channel on TVs).
When an app is running on a TV, the media player shows the app name.
Obtaining an app configuration
If there is an app you want to be able to launch from Home Assistant that isn’t detected by default, you can read the app’s configuration from the app_id attribute of the media player entity while the (unknown) app is running on your device.
Remote
The integration creates a remote entity for each configured device (TVs and speakers). You can use it to send remote control commands via the remote.send_command action. Commands are case-insensitive. You can use either the native key name (for example, vol_up) or a human-friendly alias (for example, volume_up).
TV commands
| Command | Additional aliases | Description |
|---|---|---|
back |
Go back to the previous screen | |
ch_down |
channel_down |
Channel down |
ch_prev |
previous_channel |
Jump to the previously watched channel |
ch_up |
channel_up |
Channel up |
down |
Navigate down | |
exit |
Exit the current menu | |
guide |
Open the channel guide | |
info |
Show information about the current channel or input | |
input_next |
next_input |
Cycle to the next input |
left |
Navigate left | |
menu |
Open the on-screen menu | |
mute_off |
Unmute the audio | |
mute_on |
Mute the audio | |
mute_toggle |
mute, toggle_mute
|
Toggle mute |
num_0 through num_9
|
Enter a channel digit (models without a tuner reject these) | |
ok |
enter, select
|
Confirm the current selection |
pause |
Pause playback | |
play |
Resume playback | |
pow_off |
off, power_off
|
Turn the device off |
pow_on |
on, power_on
|
Turn the device on |
pow_toggle |
power, power_toggle, toggle_power
|
Toggle the power state |
right |
Navigate right | |
seek_back |
reverse, rewind
|
Rewind playback |
seek_fwd |
forward, fast_forward, ff
|
Fast-forward playback |
smartcast |
Open the SmartCast Home screen | |
up |
Navigate up | |
vol_down |
volume_down |
Volume down |
vol_up |
volume_up |
Volume up |
Speaker commands
Speakers support a subset of the commands above:
input_next, mute_off, mute_on, mute_toggle, pause, play, pow_off, pow_on, pow_toggle, vol_down, vol_up
Aliases that map to these commands (for example, mute, volume_up, on, off) also work on speakers.
Remote command examples
Send a single command:
action: remote.send_command
target:
  entity_id: remote.vizio_smartcast
data:
  command:
    - enter
Send multiple commands:
action: remote.send_command
target:
  entity_id: remote.vizio_smartcast
data:
  command:
    - down
    - down
    - enter
Repeat a command with a delay between each repeat:
action: remote.send_command
target:
  entity_id: remote.vizio_smartcast
data:
  command:
    - volume_up
  num_repeats: 5
  delay_secs: 0.4
List of actions
The VIZIO SmartCast integrationIntegrations connect and integrate Home Assistant with your devices, services, and more. [Learn more] provides the following actions. Each link below opens a dedicated page with examples, parameters, and a step-by-step UI walkthrough.
-
Send text (
vizio.send_text) Types text into the on-screen field that currently has focus on a VIZIO SmartCast device. -
Update setting (
vizio.update_setting) Updates the value of a setting on a VIZIO SmartCast device.
For an overview of every action across all integrations, see the actions reference.
Crave portable speakers
Battery-powered VIZIO Crave portable speakers (Crave Go, Crave 360, and Crave Pro) are supported as speakers. When a speaker is set up, the integration automatically detects whether it is a Crave model — no extra configuration is needed. Speakers that were set up before this detection existed are re-checked the next time the integration loads.
Crave speakers additionally provide two diagnostic entities:
- Battery: the current battery level as a percentage.
- Charging: on while the battery is charging. A fully charged speaker is no longer drawing charge and reports off, so use the battery level to tell when it is full.
Both show as unknown while the speaker is turned off.
VIZIO SmartCast automation examples
Here is an idea to get you started.
You don’t need to edit YAML to use these examples. Copy a YAML snippet from this page, open the automation editor in Home Assistant, and press Ctrl+V (or Cmd+V on Mac). Home Assistant automatically converts the pasted YAML into the visual editor format, whether it’s a full automation, a single trigger, a condition, or an action.
Automation: start movie night
This automation turns the TV on and launches an app when you start movie night. It is triggered by a toggle helperA helper is a virtual entity you create inside Home Assistant. It is not backed by a physical device. Helpers store values, track state, or do calculations that your automations and dashboards need. [Learn more] named Movie night, which you need to create separately under Settings > Devices & services > Helpers.
-
Trigger: State changed
-
Entity: Movie night (
input_boolean.movie_night) - To: On
-
Entity: Movie night (
-
Action: Turn on media player
-
Target: VIZIO SmartCast (
media_player.vizio_smartcast)
-
Target: VIZIO SmartCast (
-
Action: Select media player source
-
Target: VIZIO SmartCast (
media_player.vizio_smartcast) - Source: Netflix
-
Target: VIZIO SmartCast (
YAML example for starting movie night
alias: "Movie night"
triggers:
  - trigger: state
    entity_id: input_boolean.movie_night
    to: "on"
actions:
  - action: media_player.turn_on
    target:
      entity_id: media_player.vizio_smartcast
  - action: media_player.select_source
    target:
      entity_id: media_player.vizio_smartcast
    data:
      source: Netflix
Data updates
This integration uses local pollingData polling is the process of querying a device or service at regular intervals to check for updates or retrieve data. By defining a custom polling interval, you can control how frequently your system checks for new data, which can help optimize performance and reduce unnecessary network traffic. [Learn more]: the device is polled every 30 seconds for power state, volume, current input, and the running app.
The SmartCast app catalog, used to build the source list for TVs, is fetched from VIZIO’s servers once a day. If the catalog cannot be fetched, a copy bundled with the vizaio library is used as a fallback.
Known limitations
Changing tracks
Changing tracks works like switching channels. If the current input is anything other than regular TV, this command might not do anything.
Troubleshooting
The device cannot be reached during setup
- Make sure the device is powered on and connected to the same network as Home Assistant.
- Verify the address and port. Running
vizaio discovershows the correct address and port for each device on your network. - Some devices only respond over the network while they are on. Turn the device on before setting it up.
Turning on the device doesn’t work
If the Power Mode of your device is set to Eco Mode, the device does not listen for network traffic while off, and turning it on from Home Assistant won’t work. Set the power mode to Quick Start to be able to turn the device on.
The device became unavailable after its IP address changed
If Zeroconf discovery is enabled, the integration updates the device’s address automatically when it is rediscovered. Otherwise, assigning the device a static IP address (via a DHCP reservation in your router) prevents the address from changing.
Pairing fails
- Ensure the PIN is entered exactly as displayed on the TV, and that the TV stays powered on during the pairing process.
- If the PIN screen never appears, power cycle the TV and restart the setup.
Removing the integration
This integration follows standard integration removal. No extra steps are required.
To remove an integration instance from Home Assistant
- Go to Settings > Devices & services and select the integration card.
- From the list of devices, select the integration instance you want to remove.
- Next to the entry, select the three dots
menu. Then, select Delete.