Thread
The Thread integrationIntegrations connect and integrate Home Assistant with your devices, services, and more. [Learn more] helps you track the different Thread networks in your home and store the Thread network credentials (similar to a Wi-Fi password). The Thread integration in Home Assistant is currently still a work in progress.
You do not need to install this integration. The Thread integration shows up automatically when Home Assistant detects a border router.
Logos on Thread-based smart home devices
If you have a Thread-based consumer device, you will typically see a Thread logo on the packaging.

The “Built on Thread: requires border router” logo means Thread is the only supported network protocol for this device. You cannot use Wi-Fi to communicate with this device.
In addition, you will see a MatterMatter is an open-source standard that defines how to control smart home devices on a Wi-Fi or Thread network. [Learn more] or Apple HomeKit logo on the packaging.
MatterMatter is an open-source standard that defines how to control smart home devices on a Wi-Fi or Thread network. [Learn more] and Apple HomeKit are smart home protocols. They are responsible for handling the Thread credentials and connecting your Thread device to the Thread network. A smart home protocol is needed to control your device. Both home automation standards are supported natively by Home Assistant.
Adding a Thread-based device to Home Assistant
How a Thread-based device is added to Home Assistant depends on the home automation standard it uses.
-
If you see the MatterMatter is an open-source standard that defines how to control smart home devices on a Wi-Fi or Thread network. [Learn more] logo on your device packaging, follow the procedure adding a Matter device to Home Assistant.

-
If you see the Apple HomeKit logo on your device packaging, follow the procedure adding a HomeKit device to Home Assistant.

About Thread
This section introduces the terms Thread and border router and lists border routers that are supported by Home Assistant.
A communication protocol for IoT devices
Thread is a low-power mesh networking standard for IoT devices. The low-power aspect is important for battery-powered smart home devices. However, it’s also low-bandwidth, making it ideal for applications that don’t send a lot of data, like switches or motion sensors.
Thread uses the same RF technology as Zigbee (IEEE 802.15.4) but provides IP connectivity similar to Wi-Fi. Unlike Zigbee, Thread by itself does not allow controlling devices: It is just a communication protocol. To control the Thread devices, a higher-level protocol is required: MatterMatter is an open-source standard that defines how to control smart home devices on a Wi-Fi or Thread network. [Learn more] or Apple HomeKit. Thread devices use the IPv6 standard to communicate both inside and outside the mesh network.
About Thread border routers
A Thread border router is a network device that connects a Thread mesh network (consisting of low-power IoT devices) to other IP networks such as Ethernet or Wi-Fi.
The IoT devices use Thread border routers to communicate outside the mesh with any IPv6-capable device. A Thread border router is connected to your network either via Wi-Fi or Ethernet and uses its RF radio chip to communicate with the Thread mesh network. The TBR routes packets between your local network and the Thread mesh. The border router does not look at the content of these packets, it just forwards them.
The Thread border router does not control devices. Device control is handled by application layer protocols like Matter or Apple HomeKit.
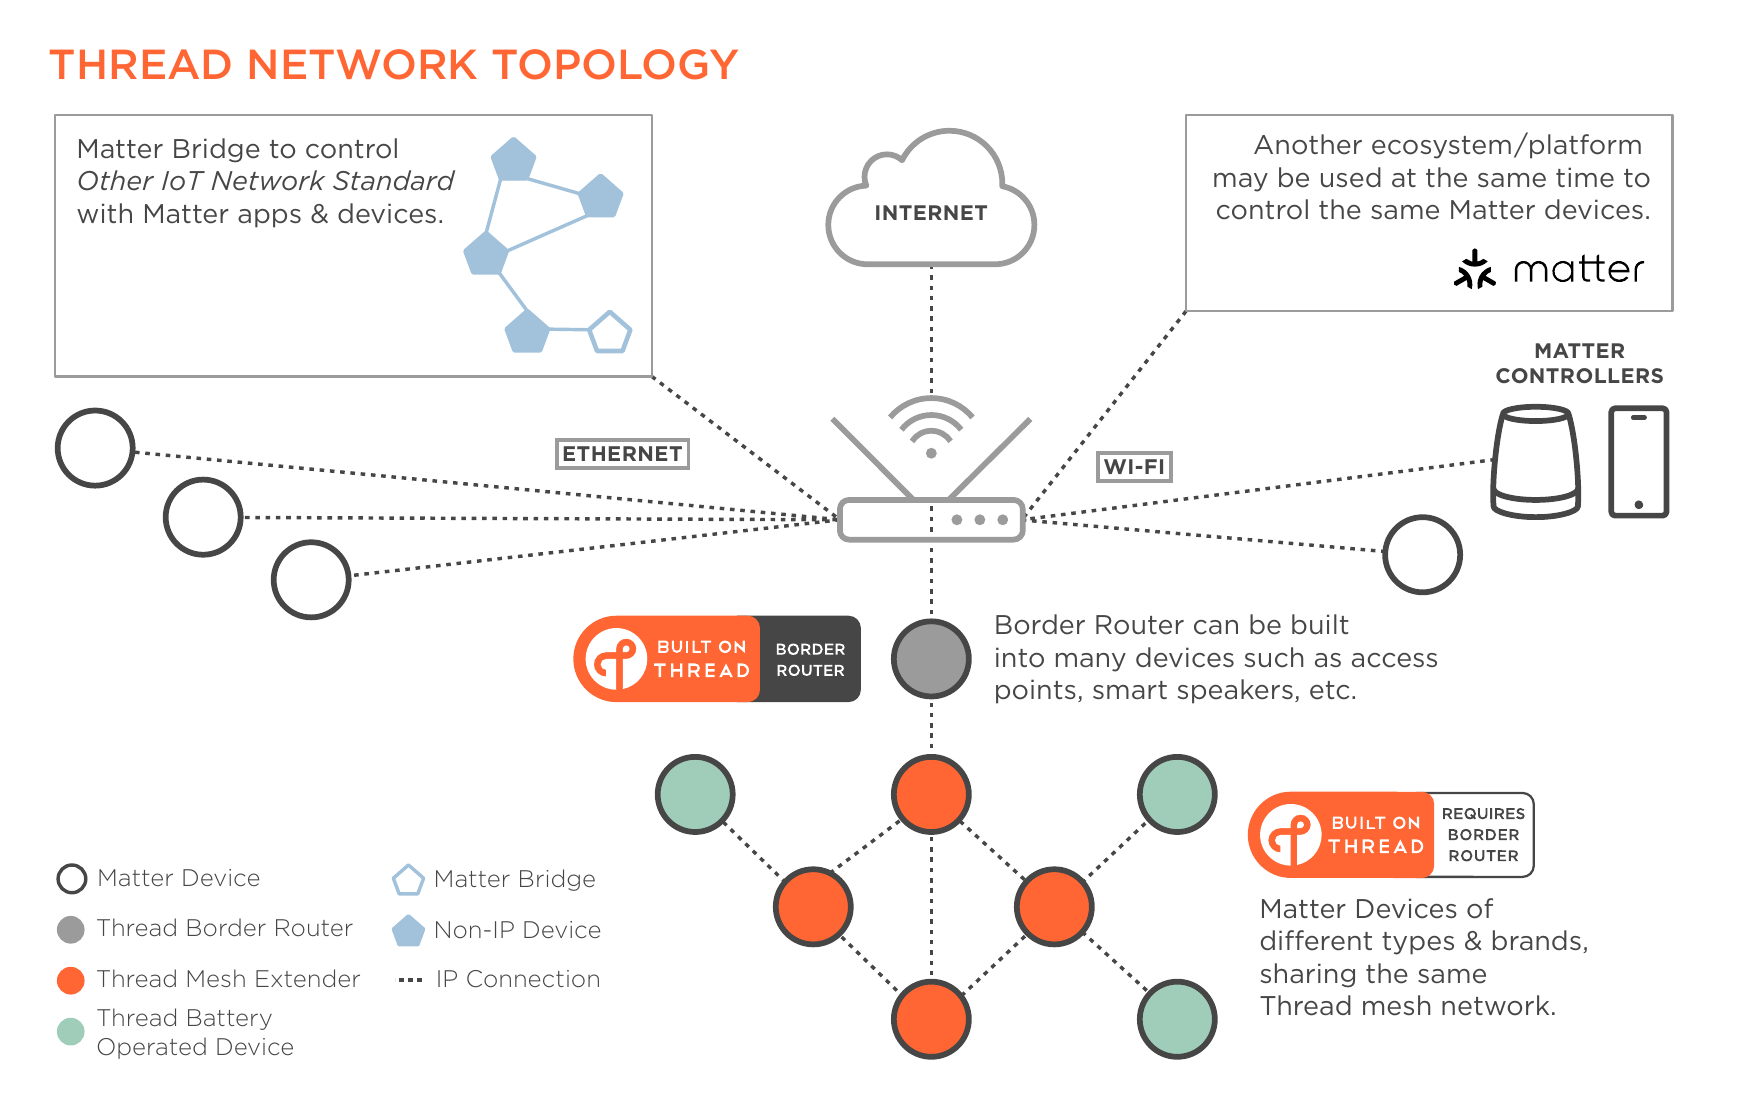
Image taken from the Thread Smart Home Fact Sheet by the Thread Group. It illustrates the landscape of MatterMatter is an open-source standard that defines how to control smart home devices on a Wi-Fi or Thread network. [Learn more], ThreadThread is a low-power mesh networking standard that is specifically designed for smart home applications. It is a protocol that defines how devices communicate. [Learn more], and Border routers. Instead of Matter, you could also see another protocol here, such as HomeKit.
Unlike other protocols, Thread can use multiple border routers in a single network. This increases wireless coverage and reduces the risk of a single point of failure. Ideal for home automation, with a potentially large number of devices spread over a large area.
OpenThread border routers
OpenThread is an open source implementation of Thread, originally released by Google. Almost all commercially available Thread border routers are based on the open source implementation. However, the configuration of TBRs is not part of the Thread standard. This means that Google and Apple TBRs implementation setup and configured by their respective ecosystems.
While Home Assistant can use any border router, it can configure and control only OpenThread border routers built with the REST API available in the open source implementation. The OpenThread Border Router app is built from this open source OpenThread code and has the REST API enabled.
List of Thread border router devices
Home Assistant can act as a Thread border router. But it also supports third-party border routers. Often, Thread border routing is only an auxiliary functionality of a smart home device. For example, the Nest Hub (2nd gen) is a smart display, a Google Home controller, and a Chromecast target, but also has a Thread border router included.
Currently, the following TBR devices are known to work with Home Assistant. These border routers may require an iPhone or Android phone for onboarding. What the exact requirements are, depends on the home automation protocol (MatterMatter is an open-source standard that defines how to control smart home devices on a Wi-Fi or Thread network. [Learn more] or Apple HomeKit) that your devices are using. Before buying a border router, check the prerequisites in the corresponding procedures:
Home Assistant
Out of the box, Home Assistant Connect ZBT-1, Connect ZBT-2, and Yellow run Zigbee, not Thread. Currently, enabling Thread involves manual steps. The integration of the Home Assistant based Thread border router with Matter is work-in-progress.
- If you have a Home Assistant Yellow, Connect ZBT-1, or a Connect ZBT-2, you can use their Thread radio. Follow these steps to turn Home Assistant into a Thread border router.
- Displays: Nest Hub (2nd gen), Nest Hub Max
- Wi-Fi routers: Nest Wifi Pro (Wi-Fi 6E), Nest Wifi
- TVs: Google TV Streamer (4K)
Apple
- Speakers: HomePod (2nd generation), HomePod mini
- TVs: Apple TV 4K (3rd generation) Wi-Fi + Ethernet, Apple TV 4K (2nd generation)
Others
There are also other companies that provide devices with border router capability, such as Nanoleaf or Amazon.
Turning Home Assistant into a Thread border router
Follow these steps if you want to turn Home Assistant into a Thread border router using the Thread radio of Yellow, Connect ZBT-1, or another compatible radio.
Find out if you already have Thread networks:
- Go to Settings > Devices & services.
- If you do not see a Thread integration, add it.
- Then, select Configure and check if you see any Thread networks on the overview page.
- Case 1: If you do not have any Thread networks yet, follow Case 1: Make Home Assistant your first Thread network
- Case 2: If you have existing networks, follow Case 2: Create a Home Assistant border router when there is an existing network
Case 1: Making Home Assistant your first Thread network
Follow these steps if you want to turn Home Assistant into a Thread border router using the Thread radio of Yellow, Connect ZBT-1, Connect ZBT-2, or another compatible radio and you do not have any third-party Thread networks present yet. This will automatically create a new Thread network with the name ha-thread-xxxx. The last four digits are a network-specific identifier (PAN ID).
Prerequisites
- Device with a Thread-capable radio, such as Home Assistant Yellow, Connect ZBT-1, Connect ZBT-2, or another compatible radio
- Android phone or iPhone
- No third-party Thread networks present
To make Home Assistant your first Thread network
-
To enable Thread support on your Home Assistant Yellow, Connect ZBT-1, or Connect ZBT-2, you need to install the OpenThread Border Router app. Follow the corresponding procedure:
-
Make sure the Home Assistant Thread network is defined as preferred network.
-
This should happen automatically, but check to be sure.
-
Go to Settings > Devices & services, select the Thread integration.
-
Then, select Configure.
-
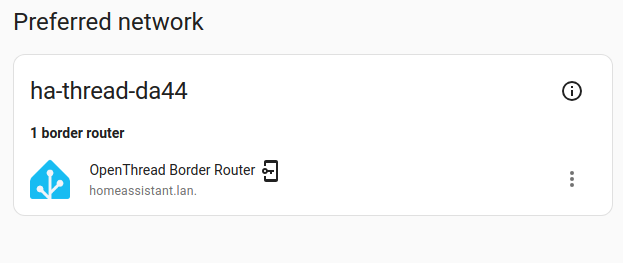
You should see the Home Assistant logo under Preferred network.
-
-
Before you can add Matter-based Thread devices, your phone needs to know the credentials of your newly created Thread network.
- To share the credentials with your Android phone, open the Home Assistant Companion app.
- In the Companion app, go to Settings > Companion app > Troubleshooting, then select Sync Thread credentials.
- Follow the instructions on screen.
- Result: You will see a confirmation stating that Thread credentials from Home Assistant have been added to this device.
- To share the credentials with your iPhone, open the Home Assistant Companion app.
- Go to Settings > Devices & services, select the Thread integration.
- Select Configure under Services.
- At the bottom of the preferred network box, select Send credentials to phone.
- To share the credentials with your Android phone, open the Home Assistant Companion app.
-
To add Matter-based Thread devices, follow the steps on Adding a matter device to Home Assistant.
Case 2: Creating a Home Assistant border router when there is an existing network
Follow these steps if you want to turn Home Assistant into a Thread border router using the Thread radio of Yellow, Connect ZBT-1, or another compatible radio but you already have third-party Thread networks present. These steps will join the Home Assistant Thread border router with the existing Thread network.
If you have both Google and Apple Thread networks present, decide which one you would like add the Home Assistant border router to.
Prerequisites
- Device with a Thread-capable radio, such as Home Assistant Yellow, Connect ZBT-1, Connect ZBT-2, or another compatible radio
- Third-party Thread network listed
- Android phone if you have a Google Thread network, iPhone if you have an Apple Thread network
To create a Home Assistant border router when there is an existing network
Note: the steps and images here show the process with a Google Thread network. But the process is very similar if you have an Apple Thread network with an iPhone.
-
Make sure you have an Android/iPhone phone and your phone is in the same Wi-Fi network as your Google border router.
-
First you need to import the Thread credentials of your Google thread network.
- In the companion app, go to Settings > Devices & services, select the Thread integration.
- On Android, select Configure and Import Credentials.
- Result: You should see a notification that the credentials are imported.
- On iOS, select Send credentials to Home Assistant.
-
Refresh the screen.
- You should now see an
 icon, indicating that Home Assistant now has the credentials of that network.
- You should now see an
-
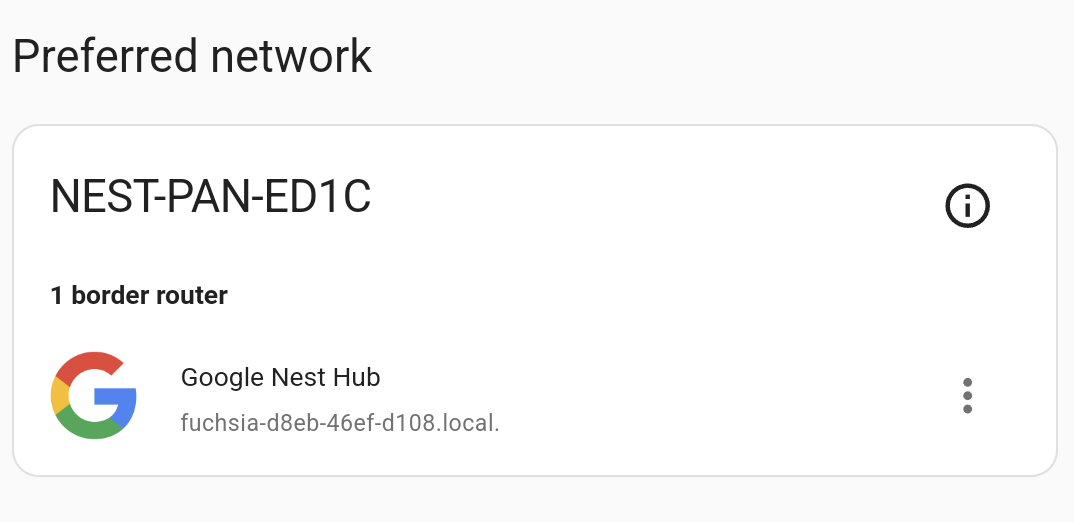
Select Make preferred network.
- Result: The selected network now shows as the preferred network.
-
To enable Thread support, you need to install the OpenThread Border Router app. Follow the corresponding procedure:
- Enable Thread on Home Assistant Yellow.
- Enable Thread on Home Assistant Connect ZBT-1.
- Enable Thread on Home Assistant Connect ZBT-2.
- Adding a Thread adapter to Home Assistant.
- Result: The network now shows as the preferred network, joined with the third-party network.
- 🎉 You successfully created a Home Assistant Thread network and joined it with a pre-existing third-party network.
Adding a third-party Thread adapter to Home Assistant
Follow these steps if you want to set up a third-party Thread adapter.
If you have a Home Assistant Thread adapter, follow the corresponding instructions instead:
- Enable Thread on Home Assistant Yellow.
- Enable Thread on Home Assistant Connect ZBT-1.
- Enable Thread on Home Assistant Connect ZBT-2.
Prerequisites
-
Home Assistant Operating System installed on your smart home hub. For example:
- On a Home Assistant Green, where Home Assistant OS is preinstalled
- On a Home Assistant Yellow or on a Raspberry Pi
- Latest updates installed
- A new Thread adapter and a USB extension cable
- If your adapter supports multiple protocols:
- They might have another firmware installed by default (Zigbee, for example).
- Check their documentation and install the OpenThread firmware on the adapter.
- Check their documentation and take a note of the baudrate.
- If your adapter supports multiple protocols:
To add a Thread adapter to the OpenThread Border Router app
- Install the OpenThread Border Router app.
- Go to Settings > Apps and select the OpenThread Border Router app.
- Plug the adapter into the extension cable and plug it into the Home Assistant hub.
- Go to Settings > Apps > OpenThread Border Router and select the Configuration tab.
- Under Devices, select your adapter.
- Enter the Baudrate as specified in the documentation of your adapter.
- If you can’t find the baudrate, try
460800or contact the manufacturer’s support. - Save your changes.
- Troubleshooting:
- Check the logs.
- If the app crashes or fails to communicate with the Thread integration: Toggle the Hardware flow control option and try again.
- If you can’t find the baudrate, try
- Restart the app and check the logs. Wait.
- Go to Settings > Devices & services, select the Thread integration.
- Select the cogwheel
. -
Result: You should now see a new
ha-threadThread network. - Troubleshooting: If you don’t see the network there, go back to the app configuration and adjust your settings, if needed, and try again.
- Select the cogwheel
Migrating a Thread network to a new adapter
Follow these steps if you already have a Thread adapter running but want to switch to a new adapter.
If you want to migrate to a Home Assistant Connect ZBT-2, follow the steps in the Home Assistant Connect ZBT-2 documentation.
Prerequisites
-
Home Assistant Operating System installed on your smart home hub. For example:
- On a Home Assistant Green, where Home Assistant OS is preinstalled
- On a Home Assistant Yellow or on a Raspberry Pi
- Existing Thread adapter connected to your Home Assistant hub
- Latest updates installed
- A new Thread adapter and a USB extension cable
- If your adapter supports multiple protocols:
- They might have another firmware installed by default (Zigbee, for example).
- Check their documentation and install the OpenThread firmware on the adapter.
- Check their documentation and take a note of the baudrate.
- If your adapter supports multiple protocols:
- Thread devices
To migrate an existing Thread network to a new adapter
- Plug the new adapter into the extension cable and plug it into the Home Assistant hub.
- Go to Settings > Apps > OpenThread Border Router and select the Configuration tab.
- Under Devices, select your adapter.
- Enter the Baudrate as specified in the documentation of your adapter.
- If you can’t find the baudrate, try
460800or contact the manufacturer’s support. - Save your changes.
- Troubleshooting:
- Check the logs.
- If the app crashes or fails to communicate with the Thread integration: Toggle the Hardware flow control option and try again.
- If you can’t find the baudrate, try
- Restart the app and check the logs. Wait.
- Info: Your Thread network is managed by Home Assistant. It is not stored on the adapter. Migrating the adapter means that Home Assistant will start to use your new adapter’s radio instead of the old one.
- Go to Settings > Devices & services, select the Thread integration.
- Select the cogwheel
. - Result: You should now see that the Thread network is still there.
- Troubleshooting: If you don’t see the network there, go back to the app configuration and adjust your settings, if needed, and try again.
- Select the cogwheel
- If you no longer want to use the old adapter, you can unplug it now.
Understanding the Thread configuration page
This section explains why you might see multiple networks on the Thread configuration page and what this means for your network.
About different Thread networks
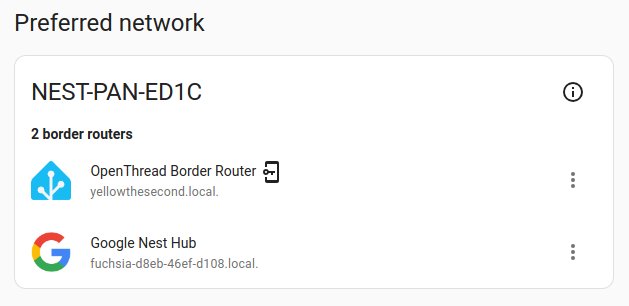
Today, each vendor forms their own Thread network when you start using their products. This means you can end up having a Home Assistant, an Apple, and a Google Thread network in your home. The Thread configuration panel lists all Thread border routers and groups them by the Thread network.
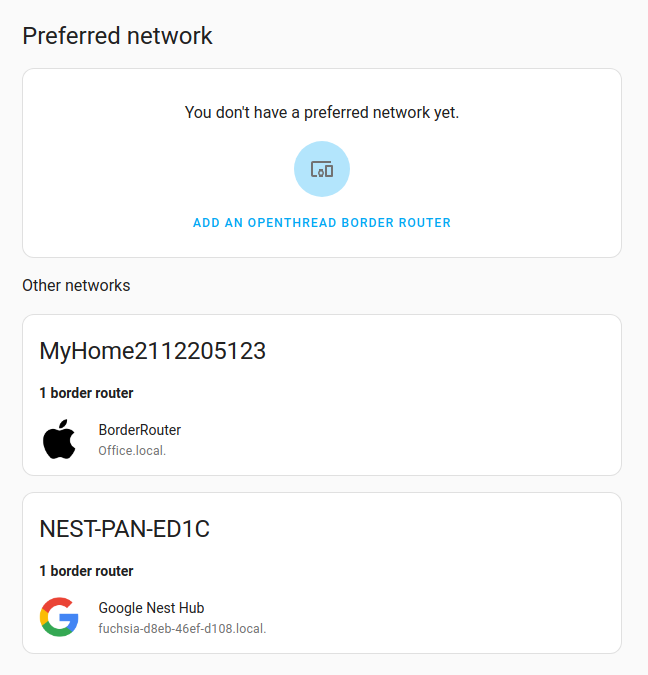
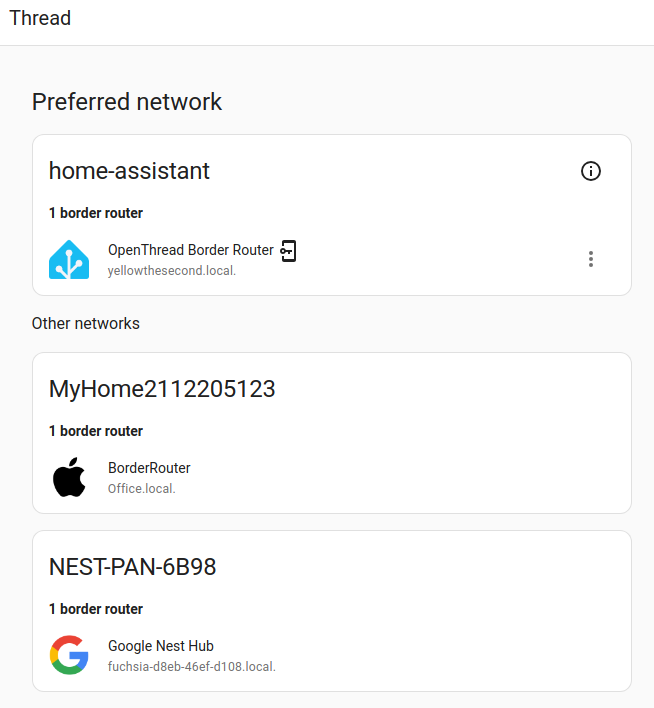 The Thread configuration page shows three vendor-specific Thread networks.
These are all separate networks using different credentials. This means devices can’t roam between the Thread networks.
The icon indicates that Home Assistant has the credentials for that network. In this case, only the credentials of the home assistant network are known.
Home Assistant discovers all Thread border routers in your network because they send mDNS/DNS-SD announcements. These local announcements don’t contain the network credentials. That’s why you see the network there, but not the credentials.
About the preferred network
The intention of the Preferred network in Home Assistant is that it will be used as the default network when adding Thread⁻based devices.
The preferred network function isn’t completely implemented yet. In particular, when adding MatterMatter is an open-source standard that defines how to control smart home devices on a Wi-Fi or Thread network. [Learn more] devices through the companion apps, the preferred network of the mobile device is being used.
Making a network your preferred network
You can only set a Thread network as preferred if the credentials are known.
-
To import Thread credentials, you need your Android and iOS companion app.
-
On your companion app, navigate to the Thread configuration page.
- You should see an Import credentials button in the lower right corner.

- Importing the credentials allows a Google- or Apple-created Thread network to be the preferred network of Home Assistant.

-
If the Make preferred network button is shown, select it.
- For more information, refer to the section on combining Thread networks.
Combining Thread networks
In the current implementation, having multiple TBRs from different vendors results in separate networks using different credentials. This prevents devices from roaming between the Thread networks. In theory, it would be better to join all Thread networks into a single network to increase the size of the mesh network. A dense mesh network should lead to better RF coverage and better link quality, which lowers transmission latencies, making communication faster.
Troubleshooting
This section helps you resolve common issues with Thread networks and device commissioning.
IPv6 is not working
Symptom: “IPv6 routing/forwarding is not enabled” warning in the OTBR app logs, or Thread devices join the network but cannot be reached
Thread is an IPv6-only protocol. For Thread devices to communicate with Home Assistant and other devices on your network, your Home Assistant system must have working IPv6 connectivity. In setups that route traffic between networks, IPv6 forwarding must also be enabled on the system acting as the router. If any required layer is missing IPv6 support, Thread devices may join the mesh but fail to communicate beyond it.
Layers to check
Every setup should have these basics in place:
- Home Assistant host — the system where Home Assistant runs must have working IPv6 connectivity
- Network router — the device that manages traffic on your local network must support IPv6 routing for your network
Depending on how Home Assistant is deployed, there may be additional layers to check:
- Hypervisor host — if Home Assistant runs inside a virtual machine, like Proxmox, ESXi, or VirtualBox, make sure the virtual NIC connected to the Home Assistant VM has IPv6 connectivity. In bridged setups, the hypervisor usually does not need IPv6 forwarding. If the hypervisor is routing traffic, IPv6 forwarding may be required there
- Docker daemon — if Home Assistant runs as a container, Docker may need IPv6 enabled in its configuration
- Host operating system — if Home Assistant runs as a container on Linux, the host OS may need IPv6 forwarding enabled at the kernel level when it is routing container traffic
The warning in the OTBR app logs only detects whether IPv6 forwarding is enabled on the Home Assistant host itself. Issues at the hypervisor, Docker, host OS, virtual network, or router layer will not trigger this warning but can still prevent Thread devices from communicating.
Home Assistant Operating System
IPv6 may not be enabled in Docker on your Home Assistant OS installation. There is currently no UI option for this setting — it must be changed from the command line. To check and enable it:
-
Open the Terminal & SSH app (or any equivalent terminal app).
-
Check the current setting:
ha docker infoIf
enable_ipv6showsnullorfalse, enable it:ha docker options --enable-ipv6=true -
Reboot the Home Assistant host for the change to take effect:
ha host reboot
If Home Assistant OS is running inside a virtual machine, make sure the VM has IPv6 connectivity. If the hypervisor is routing traffic (rather than bridging), IPv6 forwarding may also need to be enabled. Refer to your hypervisor’s documentation for instructions.
Home Assistant Container
If you are running Home Assistant Container, there are two additional layers to check on the machine that hosts the container:
- Docker daemon — IPv6 must be enabled in the Docker daemon configuration. Refer to the Docker documentation on enabling IPv6 for instructions.
- Host operating system — the Linux host needs IPv6 forwarding enabled at the kernel level. Refer to your distribution’s documentation for instructions on enabling IPv6 forwarding.
If the host machine is itself a virtual machine, make sure the VM has IPv6 connectivity. If the hypervisor is routing traffic (rather than bridging), IPv6 forwarding may also need to be enabled. Refer to your hypervisor’s documentation for instructions.
Network router
Your network router needs IPv6 forwarding enabled so that IPv6 traffic can flow between your local network and the Thread mesh. Refer to your router’s documentation for details on enabling IPv6 support and forwarding.
Changing the Thread channel
Symptom: frequent pairing failures or poor device communication
If you experience frequent pairing failures or devices that drop off the network, the Thread channel may be suffering from interference.
Description
Thread uses the IEEE 802.15.4 radio standard, which operates in the 2.4 GHz band — the same band used by Wi-Fi and Bluetooth. Thread channels 11 through 24 can overlap with 2.4 GHz Wi-Fi, including common Wi-Fi channels like 1, 6, and 11. This overlap can cause interference that prevents the Thread radio from transmitting successfully.
A sign of interference in the OTBR app logs is repeated ChannelAccessFailure errors. This means the radio attempted to send a frame but the channel was too busy, even after multiple retries.
Thread channel 26 is the least likely to experience Wi-Fi interference. Channel 25 can also help reduce interference, but it may still partially overlap with some Wi-Fi configurations, depending on channel width. Channel 26 is a common recommendation for environments with heavy Wi-Fi traffic.
Resolution
You can change the Thread channel through the Thread integration in Home Assistant.
- Go to Settings > Devices & services and select the Thread integration.
- Select Configure.
- Change the channel to your desired value (for example, 26).
- After you confirm the change, the network will continue to operate normally on the current channel. The border router schedules the switch for approximately five minutes later so that all devices on the mesh can learn about the new channel and switch simultaneously. During this waiting period, nothing will appear to have changed — this is expected. Do not restart the border router or make additional changes while the switch is pending.
If you already have Thread devices paired, changing the channel will temporarily disrupt communication while devices transition. For best results, change the channel before pairing devices if possible.
Pairing a Thread device fails
Symptom: the device is in pairing mode, but commissioning does not complete
You are trying to add a Thread device through the Home Assistant Companion app, but the process fails or times out.
Description
Pairing a Thread device involves multiple steps that happen automatically: your phone connects to the device over Bluetooth Low Energy (BLE), shares the Thread network credentials, and then the device joins the Thread mesh and gets commissioned into Home Assistant. A failure at any of these steps can cause pairing to fail.
Resolution
First, make sure you have followed all the prerequisites for adding a Matter device, including phone setup and Bluetooth requirements. Refer to the adding a Matter device to Home Assistant procedure for the full checklist.
If pairing still fails after verifying the prerequisites, check the following:
- The device is still in pairing mode. Most devices only stay in pairing mode for a limited time. If it expires, reset the device to pairing mode and try again.
- Mesh Wi-Fi access points are not blocking multicast. Some mesh Wi-Fi systems aggressively filter multicast traffic on Wi-Fi. This can prevent your phone from discovering the border router via mDNS. If you suspect this, check your mesh system’s settings for options related to multicast, IGMP snooping, or mDNS.
Understanding OTBR log messages
The OpenThread Border Router app logs can contain messages that look alarming but are often normal behavior. Here is what some of the most common messages mean.
ChannelAccessFailure
Handle transmit done failed: ChannelAccessFailure
This means the radio tried to transmit but the channel was too busy. The radio performs a “clear channel assessment” before sending, and if it detects other traffic, it backs off and retries. After 16 failed attempts, it reports this error.
Occasional ChannelAccessFailure messages are normal, especially on channels that overlap with Wi-Fi. If you see them frequently (multiple times per minute), consider changing the Thread channel to one with less interference, such as channel 25 or 26.
NoAck
Failed to send IPv6 UDP msg... error:NoAck
This means the border router sent a message to a device, but the device did not acknowledge it. For battery-powered devices (known as Sleepy End Devices), this is expected. These devices turn off their radio most of the time to conserve battery and only wake up periodically to check for messages. The border router queues messages and delivers them when the device wakes up.
If you see NoAck errors for a device that should be powered on and responsive, the device may be out of range or experiencing a hardware issue.
mDNSPlatformSendUDP errors
mDNSPlatformSendUDP got error 99
(Cannot assign requested address)
These errors typically appear for Docker virtual network interfaces (veth devices) and are cosmetic. The mDNS responder inside the OTBR container tries to send multicast on all network interfaces, including internal Docker bridge interfaces that cannot send multicast. These errors do not affect the border router’s ability to advertise on your actual network.