Landis+Gyr Heat Meter
The Landis+Gyr Heat Meter integrationIntegrations connect and integrate Home Assistant with your devices, services, and more. [Learn more] for Home Assistant allows you to read the meter values from Ultraheat devices by Landis & Gyr. These devices are commonly used for district heating. The integration has been tested with the Landis & Gyr Ultraheat 50, UH50 (type LUGCUH50) and T550 (type LGUHT550). Other models could work. The T330 is not yet supported.
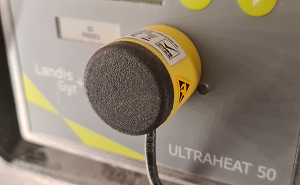
The device is read through the optical interface. You need an IR head connected to Home Assistant. You can use either a USB IR read/write head (IEC 62056-21) or a TTL IR read/write head connected to an ESPHome device.
Configuration
To add the Landis+Gyr Heat Meter device to your Home Assistant instance, use this My button:

If the above My button doesn’t work, you can also perform the following steps manually:
-
Browse to your Home Assistant instance.
-
In the bottom right corner, select the
Add Integration button. -
From the list, select Landis+Gyr Heat Meter.
-
Follow the instructions on screen to complete the setup.
Sensors
The integration will create the following sensors:
- Heat usage (GJ or MWh)
- Volume usage (m3)
Heat usage is reported in either GJ (UH50) or MWh (T550). (Note: 1 GJ = 0.277778 MWh.)
Further data that is read from the device is added as diagnostic entities:
- Ownership number
- Volume previous year (m3)
- Heat previous year (GJ or MWh)
- Error number
- Device number
- Measurement period minutes
- Power max (kW)
- Power max previous year (kW)
- Flow rate max (m3ph)
- Flow rate max previous year (m3ph)
- Flow temperature max (°C)
- Return temperature max (°C)
- Flow temperature max previous year (°C)
- Return temperature max previous year (°C)
- Operating hours
- Fault hours
- Fault hours previous year
- Yearly set day
- Monthly set day
- Meter date time
- Measuring range (m3ph)
- Settings and firmware
- Flow hours
Energy dashboard
Either heat usage or volume usage can be used as “Gas” on the energy dashboard. If your device reports GJ, enter the price per GJ. If your device reports MWh, enter the price per MWh. In both cases, the energy dashboard converts usage to kWh.
Polling the device
Polling is by default done only once per day (and once right after adding the integration). Some sources claim that every time the Heat Meter values are read, battery life goes down by about 30 minutes, but this is not confirmed.
Polling manually (optional)
For detailed control on when the device is polled, disable the default polling for this integration and create an automation that will update one of the entities (the other entities will be updated as well)
If you’re comfortable with YAML, this code could be used:
alias: Heat Meter update
triggers:
  - minutes: "/10"
    trigger: time_pattern
actions:
  - target:
      entity_id: sensor.heat_meter_heat_usage_gj  # If your device reports MWh this will be heat_meter_heat_usage_mwh
    action: homeassistant.update_entity
mode: single
For more detailed steps on how to define a custom polling interval, follow the procedure below.
Defining a custom polling interval
If you want to define a specific interval at which your device is being polled for data, you can disable the default polling interval and create your own polling automation.
To add the automation:
- Go to Settings > Devices & services, and select your integration.
- On the integration entry, select the
. - Then, select System options and toggle the button to disable polling.
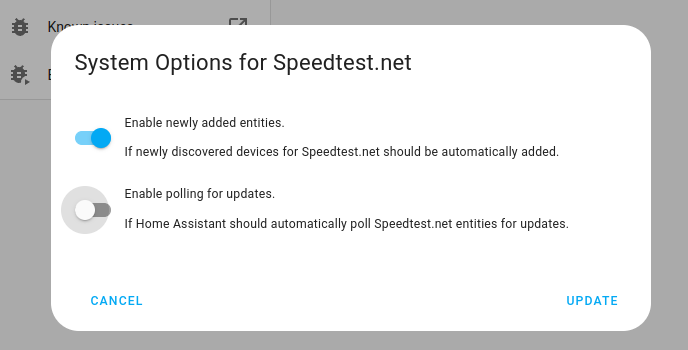
- Then, select System options and toggle the button to disable polling.
- To define your custom polling interval, create an automation.
- Go to Settings > Automations & scenes and create a new automation.
- Define any trigger and condition you like.
- Select Add action, then select Other actions.
- Select Perform action, and from the list, select the
homeassistant.update_entityaction. - Add the entities you want to poll to the Entity field. The
homeassistant.update_entityaction only supports targeting by entity. Selecting an area, device, or label is not supported.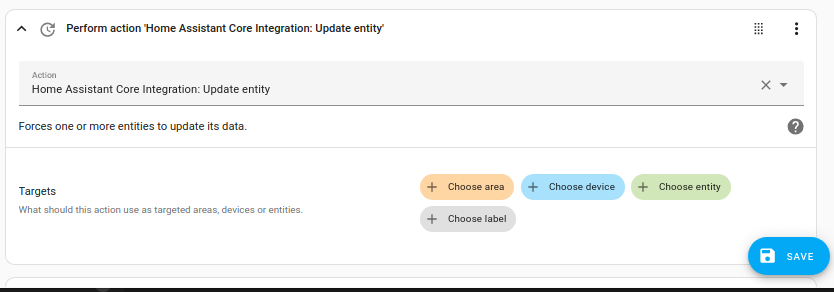
- Save your new automation to poll for data.
Note that homeassistant.update_entity has a 10-second debounce, which means that entities cannot be updated more frequently than once every ten seconds through this method.
Using a USB cable or ESPHome cable
The heat meter is read through a small infrared (IR) read/write head that clips onto the meter’s optical port. You can connect this head in two ways:
- USB IR head: plugs directly into the machine running Home Assistant and works without any extra setup.
- TTL IR head: wires to an ESP device (such as an ESP32) and reaches Home Assistant wirelessly over your network through ESPHome.
If you want a wireless setup, use a TTL IR head with an ESP device. A USB IR head cannot be used this way because ESPHome does not yet support USB IR heads.
Include this in your ESPHome config:
uart:
  - id: meter_uart
    tx_pin: YOUR_BOARD_TX_PIN   # For example GPIO17
    rx_pin: YOUR_BOARD_RX_PIN   # For example GPIO18
    baud_rate: 300
    data_bits: 7
    parity: EVEN
    stop_bits: 1

serial_proxy:
  - id: meter_serial_proxy
    uart_id: meter_uart
    # Name shown in Home Assistant.
    name: "Heat meter IR cable"
    port_type: TTL