Google Maps Travel Time
The Google Maps Travel Time integrationIntegrations connect and integrate Home Assistant with your devices, services, and more. [Learn more] provides travel time from the Google Maps Routes API.
Setup
You need to register for an API key by following the instructions here. You only need to turn on the Routes API.
Google requires billing to be enabled (and a valid credit card loaded) to access Google Maps APIs. The integration consumes the Compute Routes Pro API providing 5,000 free requests per month. The sensor will update the travel time every 10 minutes, making approximately 144 calls per day. Note that at this rate, using more than 1 sensor will exceed the free credit limit. As the update frequency cannot be decreased, if you require more frequent data updates, consider triggering on-demand updates (see the automation example below).
A quota can be set against the API to avoid exceeding the free credit amount. Set the ‘Elements per day’ to a limit of 161 or less. Details on how to configure a quota can be found here.
Configuration
To add the Google Maps Travel Time service to your Home Assistant instance, use this My button:

If the above My button doesn’t work, you can also perform the following steps manually:
-
Browse to your Home Assistant instance.
-
In the bottom right corner, select the
Add Integration button. -
From the list, select Google Maps Travel Time.
-
Follow the instructions on screen to complete the setup.
Notes:
- Origin and Destination can be the address or the GPS coordinates of the location (GPS coordinates have to be separated by a comma). You can also enter an entity ID that provides this information in its state, an entity ID with latitude and longitude attributes, or zone friendly name (case sensitive).
Actions
The integration provides the following actions.
Action: Get travel times
The google_travel_time.get_travel_times action retrieves route alternatives and travel times between two locations. It populates response data.
-
Data attribute:
config_entry_id- Description: The config entry to use for this action.
- Optional: No
-
Data attribute:
origin- Description: The origin of the route. You can use an address, GPS coordinates, or an entity ID.
- Optional: No
-
Data attribute:
destination- Description: The destination of the route. You can use an address, GPS coordinates, or an entity ID.
- Optional: No
-
Data attribute:
mode-
Description: The mode of transportation. Available options:
driving,walking,bicycling. - Optional: Yes
-
Description: The mode of transportation. Available options:
-
Data attribute:
units-
Description: Which unit system to use. Available options:
metric,imperial. - Optional: Yes
-
Description: Which unit system to use. Available options:
-
Data attribute:
language- Description: The language to use for the response.
- Optional: Yes
-
Data attribute:
avoid-
Description: Features to avoid when calculating the route. Available options:
tolls,highways,ferries,indoor. - Optional: Yes
-
Description: Features to avoid when calculating the route. Available options:
-
Data attribute:
traffic_model-
Description: The traffic model to use when calculating driving routes. Available options:
best_guess,pessimistic,optimistic. - Optional: Yes
-
Description: The traffic model to use when calculating driving routes. Available options:
-
Data attribute:
departure_time-
Description: The desired departure time as a time string, for example
08:00:00. - Optional: Yes
-
Description: The desired departure time as a time string, for example
Action: Get transit times
The google_travel_time.get_transit_times action retrieves route alternatives and travel times between two locations using public transit. It populates response data.
-
Data attribute:
config_entry_id- Description: The config entry to use for this action.
- Optional: No
-
Data attribute:
origin- Description: The origin of the route. You can use an address, GPS coordinates, or an entity ID.
- Optional: No
-
Data attribute:
destination- Description: The destination of the route. You can use an address, GPS coordinates, or an entity ID.
- Optional: No
-
Data attribute:
units-
Description: Which unit system to use. Available options:
metric,imperial. - Optional: Yes
-
Description: Which unit system to use. Available options:
-
Data attribute:
language- Description: The language to use for the response.
- Optional: Yes
-
Data attribute:
transit_mode-
Description: The preferred transit mode. Available options:
bus,subway,train,tram,rail. - Optional: Yes
-
Description: The preferred transit mode. Available options:
-
Data attribute:
transit_routing_preference-
Description: The transit routing preference. Available options:
less_walking,fewer_transfers. - Optional: Yes
-
Description: The transit routing preference. Available options:
-
Data attribute:
departure_time-
Description: The desired departure time as a time string, for example
08:00:00. - Optional: Yes
-
Description: The desired departure time as a time string, for example
-
Data attribute:
arrival_time-
Description: The desired arrival time as a time string, for example
08:00:00. - Optional: Yes
-
Description: The desired arrival time as a time string, for example
You can either use departure_time or arrival_time, not both.
Dynamic Configuration
Tracking can be setup to track entities of type device_tracker, zone, sensor and person. If an entity is placed in the Origin or Destination then every 5 minutes when the platform updates it will use the latest location of that entity.
Examples
Tracking entity to entity
Origin: device_tracker.mobile_phone Destination: zone.home
Tracking entity to zone friendly name (e.g. “Eddies House”)
Origin: zone.home Destination: Eddies House
Entity Tracking
-
device_tracker
- If state is a zone then the zone location will be used
- If state is not a zone it will look for the longitude and latitude attributes
-
zone
- Uses the longitude and latitude attributes
- Can also be referenced by just the zone’s friendly name found in the attributes.
-
sensor
- If state is a zone or zone friendly name then will use the zone location
- All other states will be passed directly into the Google API
- This includes all valid locations listed in the Configuration Variables
Updating sensors on-demand using Automation
Using automatic polling can lead to calls that exceed your API limit, especially when you are tracking multiple travel times using the same API key. To use more granular polling, disable automated polling.
You can use the homeassistant.update_entity action to update the sensor on-demand. For example, if you want to update sensor.morning_commute every 2 minutes on weekday mornings, you can use the following automation:
- alias: "Commute - Update morning commute sensor"
  initial_state: "on"
  triggers:
    - trigger: time_pattern
      minutes: "/2"
  conditions:
    - condition: time
      after: "08:00:00"
      before: "11:00:00"
    - condition: time
      weekday:
        - mon
        - tue
        - wed
        - thu
        - fri
  actions:
    - action: homeassistant.update_entity
      target:
        entity_id: sensor.morning_commute
For more detailed steps on how to define a custom polling interval, follow the procedure below.
Defining a custom polling interval
If you want to define a specific interval at which your device is being polled for data, you can disable the default polling interval and create your own polling automation.
To add the automation:
- Go to Settings > Devices & services, and select your integration.
- On the integration entry, select the
. - Then, select System options and toggle the button to disable polling.
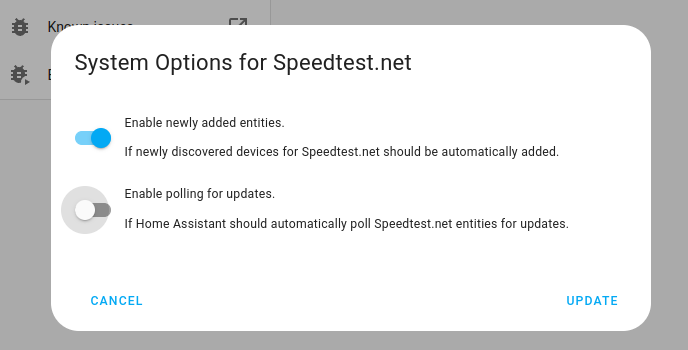
- Then, select System options and toggle the button to disable polling.
- To define your custom polling interval, create an automation.
- Go to Settings > Automations & scenes and create a new automation.
- Define any trigger and condition you like.
- Select Add action, then select Other actions.
- Select Perform action, and from the list, select the
homeassistant.update_entityaction. - Add the entities you want to poll to the Entity field. The
homeassistant.update_entityaction only supports targeting by entity. Selecting an area, device, or label is not supported.
- Save your new automation to poll for data.